
Sourcing
Candidate Sourcing Automation: Ultimate Guide to Finding Candidates at Scale
How can you automate parts of your work as a sourcer or recruiter to boost your efficiency.

CEO & Co-founder · Matchr

Everything repetitive can be automated…
In this article, I will show you what tools you can use to automate parts of your work as a sourcer or recruiter to massively improve your efficiency.
Why is this article useful for you:
- You will understand the advantages and disadvantages of automation
- You will learn what the best tools are on the market
- You will learn example applications of tooling
- You will learn a step-by-step approach to quickly go through hundreds of profiles
- You will learn how to send personalized messages at scale.
Note to reader: this article has been written by a human 😉
The advantages and disadvantages of automation in sourcing and recruitment
Automating your sourcing and recruitment activities has some clear advantages and disadvantages. In this section, I will address them.
Advantages
When you automate parts of your sourcing or recruitment process, there are three clear advantages.
- Speed: steps that would take you minutes if not hours can be automated and done in seconds.
- Time: as a logical consequence, you will not only be faster at what you do but also save a lot of time that you can spend on tasks that can’t be automated.
- Eliminate repetitive tasks: automation allows you to have a robot do your repetitive and often boring tasks even when you are asleep.
Disadvantages
- Robot: Ever called a customer support line that drags you through a ‘choice’ menu in which you need to state your reason to call, and it takes forever to get to talk to an actual human? Exactly, people don’t like to talk to robots.
- Creative: it is hard to be creative when you automate your sourcing and recruitment process because everything needs to go through the same steps.
- Control: By automating steps in your sourcing and recruitment process, you can save a lot of time but, simultaneously, give up a certain amount of control. If something breaks down in your process, you can send hundreds or thousands of people the wrong information.
What tools can you use to make your sourcing and recruiting easier
So many amazing tools on the market can help you be more efficient in every single step of the sourcing and recruitment process. At MatcHR, we constantly test new tools, and below we have listed our favorite tools that we tested and used.
Automation tools for LinkedIn messaging
There are a lot of tools to send automated connection requests and messages to LinkedIn contacts. We have listed our top four below.
Dux-Soup lets you send automated messages via LinkedIn, make connections with people outside of your network, and can even start drip campaigns with automated follow-up messages.
Dux-Soup offers a free version, a pro version for $14.99, and a turbo version for $55 (what’s up with the big price increase Dux-Soup?)
Jobin.cloud allows you to send LinkedIn connection invitations, LinkedIn messages and InMails singularly or in bulk, as well as using the Jobin drip messaging campaigns manager.
All messages use custom templates that are personalized with smart fields and even AI-generated text, gathering information from enriched profile data.
When LinkedIn is not an option, the same functionality works with emails as well. Jobin.cloud is the only platform that has an internal ChatGPT integration to hyper-personalize messages, and it can also manage standard follow-ups and replies.
Within Jobin.cloud, there is also a ‘Smart inbox’ where you can merge multichannel communications with your prospects. Additionally, Jobin.cloud automates invitation withdrawals and allows for filtering by ‘connection pending’, ‘is 1st connection’, and several other LinkedIn tags.”
Jobin.cloud offers a Free version, a Starter version for €7.99, a Pro for €19.99 and an Ultimate at €34.99.
Phantombuster is an automation tool that allows you to scrape and automate many activities on larger social media platforms, including Instagram, Medium, and LinkedIn.
Phantombuster enables you to send LinkedIn connection requests and messages to a predefined target list similar to Dux-Soup. The advantage that Phantombuster has over Dux-Soup is that it enables you to automate many activities on LinkedIn and combine different steps. Secondly, it integrates well with Google Sheets and creates a workflow for you to track who responds to your automated connection requests.
The downside of Phantombuster over Dux-Soup is that it is relatively slow compared to Dux-Soup, and Dux-Soup is easier to set up.
Phantombuster is free for the first 14 days, and after, you need to pay $59-399 per month, depending on your chosen plan.
This is the most sophisticated tool and also the most expensive tool. Expandi does everything that Dux-Soup does, but they have created a dashboard to keep track of your activities and follow-ups. If you have multiple LinkedIn accounts you can use them in Expandi, and they integrate with the larger CRM systems.
Expandi.io costs $99 per seat per month (say what?)
Automation tools for scraping
Instant Data Scraper is the Volkswagen Golf under the scrapers. Easy to drive and affordable, but nobody will turn his head when you drive by. To work for you, you don’t have to understand anything about scraping for Instant Data Scraper. Just download the chrome plug-in, click on the extension of Instant Data Scraper and see if it’s able to scrape the site you are visiting. If not, it’s time to use Data Miner.
Instant data scraper is free.
Data Miner is a little more advanced compared to Instant Data Scraper.
Next to pre-defined scrape ‘recipes’ (scripts), it enables you to create your recipe and scrape a website. It does take a few hours of watching tutorials to understand how to make Data Miner work, but it is definitely worth the effort. The first time it works, it does feel pretty badass and works well with other sourcers/recruiters to show off :). It’s like driving a Jaguar. Some people will turn their heads when you drive by.
Data Miner is free.
Yes, Phantombuster again, and you will see even more of Phantombuster.
Phantombuster allows you to scrape social media platforms like Instagram, Medium, Google Maps, Facebook, and LinkedIn.
Especially their ability to scrape data from LinkedIn makes it a very powerful scraping tool.
Phantombuster can scrape data from LinkedIn Groups (useful for finding relevant candidates or research) and scrape all publicly available data from a LinkedIn profile, including a print screen of someone’s LinkedIn profile.
Phantombuster is free for the first 14 days, and you need to pay $59-399 monthly.
Automation tools for the email follow-up
Trinsly was created by David Kim, a developer who also worked as an IT recruiter for a while (yes, they exist). Based on his experience and what he was lacking, he created Trinsly.
Trinlsy is an automated email follow-up tool integrated with LinkedIn. It allows you to send automated email follow-up messages to candidates or prospects directly from LinkedIn. It keeps track of your conversions and can send bulk email campaigns.
Trinsly costs $59 per user per month.
Where Trinsly is really focused on sourcers and recruiters, Lemlist is really focused on sales.
The advantage of Lemlist over Trinsly is that it allows great visual personalization in your email templates. Especially their ability to create personalized landing pages with a video message is unrivaled. Lemlist has a great newsletter and Facebook group where users actively share their best practices.
You can try Lemlist for free for 2 weeks. They have 3 plans Silver $29 per user per month, $49 per user per month, which allows for personalized images, and $99 per user per month, which allows dynamic landing pages and video integration.
Tools for contact finding
There are so many contact-finding tools on the market that it is hard to see how they differ. We have selected three tools that we know bring results.
Our favorite tool. The reason is simple, SalesQL integrates with LinkedIn Sales Navigator, enabling you to scrape up to 1,000 candidates in minutes, including their personal and business email addresses.
SalesQL is free for the first 100 credits, it’s the cheapest plan is $39 for 1,500 contacts and $89 for 10,000 contacts.
ContactOut finds you email addresses straight from LinkedIn. It claims that 30% of recruiters of Fortune 500 companies use Contactout. Not sure if that is a good or bad thing ;). Anyway, it is straightforward and finds you email addresses straight from LinkedIn.
There is a free plan, but it is unsuitable for sourcers who work at scale. Paid plans start at $29/month.
One of the best tools to find personal email addresses and one of the most expensive tools, with 200 credits for $199 (come on, guys!)
Tools for Sourcing Process Automation
Okay, this whole article is about ‘automation’, and the tools mentioned above play a role in making your life easier. However, two tools truly stand out from the rest.
Where to start with Zapier. Arguably the mother of all automation tools in sourcing and recruitment. Zapier enables you to connect tools that on their own are not connected. See it as the bridge you need to cross to go from point A to B. To give you a few examples.
- Someone fills a form in on your website. Zapier enables you to transfer this data directly to your CRM.
- Someone filled in a form in Typeform, Google Forms. Zapier transfers your data to your CRM.
- Someone connects with you on LinkedIn. Zapier can transfer the email details to your CRM (Lemlist, for example) and transfer this data to your FB group.
There are over 2.000 “Zaps,” and once you get the hang of it, Zapier is a tremendous time saver.
Zapier is free for the first 5 Zaps you use, but if you want to combine multiple Zaps, you pay $19.99 per month for 20 Zaps up to $299 for unlimited Zaps for your company.
Here we go again, but Phantombuster is just such a versatile tool that it is worth mentioning Phantombuster once more.
If only the team of Phantombuster would respond to all the free publicity, I bring them.
Messaging Automation: How to Search and Send Personalized Messages at Scale
The tradeoff sourcers and recruiters constantly need to make is to focus on quantity or quality. Reaching out to hundreds of people doesn’t allow any sort of personalization where writing personalized emails every single time can quickly turn into an inefficient process.
In the section below, I will show you a step-by-step approach to how you can search through hundreds of candidates, filter out false positives, and send emails and connection requests that feel (very) personal at scale without ever checking a single LinkedIn profile…
The result will look like this:
Key summary process:
- You run a search on LinkedIn.
- You scrape your search results with SalesQL and enrich your search with email addresses.
- You filter out false positives.
- You upload your search result in Phantombuster and scrape all publicly available data from your candidates’ LinkedIn profiles, including LinkedIn screenshots.
- You filter out false positives using Google sheets.
- You upload the candidates you want to reach out to in Dux-Soup and send automated connection requests.
- You check the email addresses for deliverability with Bouncer.
- You upload the candidates you want to reach out to in Lemlist and send semi-personalized emails, including someone’s LinkedIn screenshot.
- Book a holiday
Step 1. LinkedIn search
Run a Boolean search on LinkedIn. Make sure to check whether you are finding the right candidates. Garbage in is garbage out. We use LinkedIn Sales Navigator because it is the cheapest version of LinkedIn with very similar features to Recruiter Lite and has the most integration options with tools like Phantombuster and SalesQL.
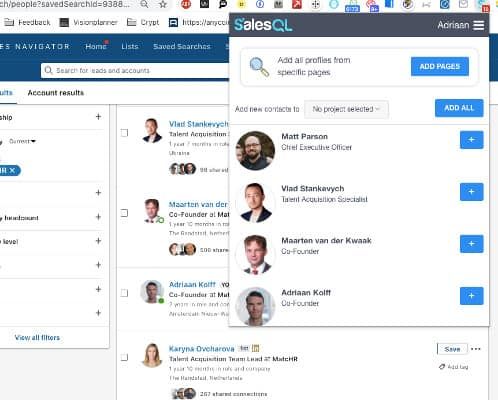
Step 2. Scrape data with SalesQL
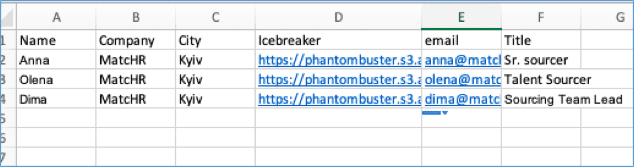
SalesQL enables you to scrape your search results from LinkedIn directly into a spreadsheet in minutes. Up to 1,000 profiles at the same time.
Below is an example of the results:
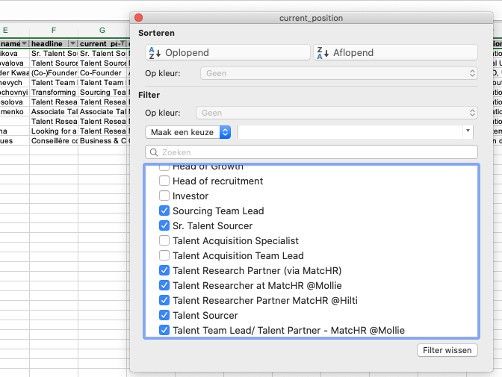
Step 3. Filter out false positives
SalesQL provides some basic information that allows you to filter out the first false positives of your search. In this example, I am looking for a Sr. Sourcer from MatcHR, so I want to eliminate people that don’t have anything to do with sourcing before I move on.
Step 4. Scrape all publicly available data with Phantombuster, including screenshots
After you have created your Phantombuster account and downloaded their Chrome plug-in, you need to use the Phantom “LinkedIn profile scraper” for this automation. Click on “Use this Phantom.”
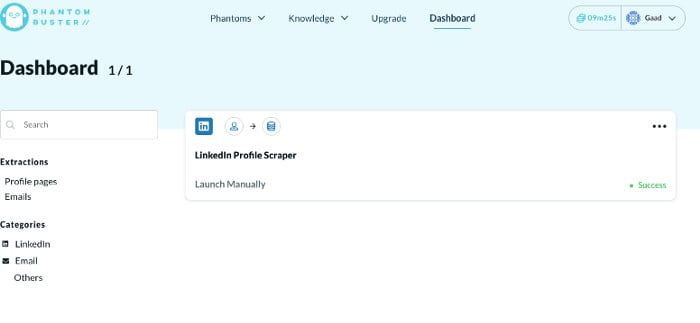
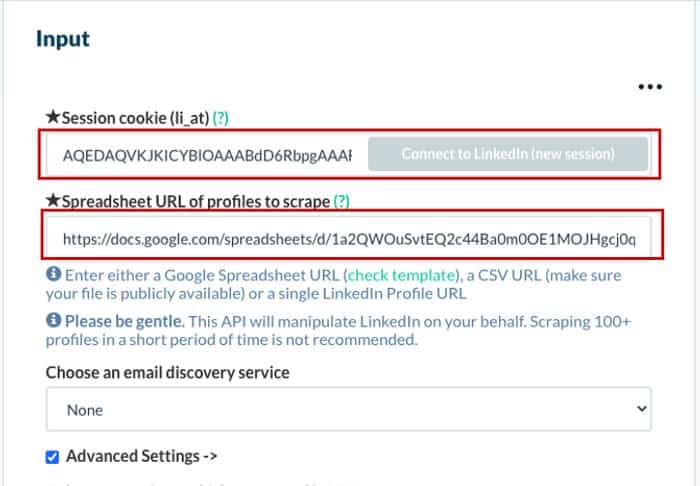
Once you have clicked on “Use this Phantom,” you will go to the screen below. You need to click on “connect to LinkedIn” to give Phantombuster access to your LinkedIn account.
Click on “connect to LinkedIn” (in red).
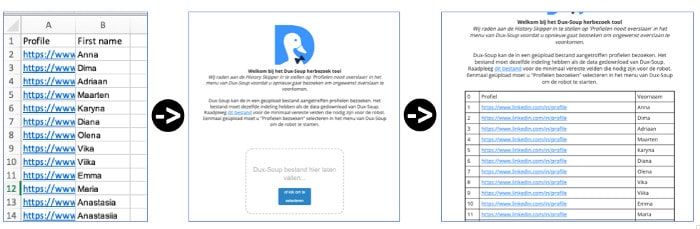
The second step is to make sure that all your candidates’ LinkedIn URLs from your SalesQL results are in a Google drive sheet and that you make this Google Drive spreadsheet ‘editable’ for everyone.
Copy and paste the URL of your spreadsheet into the field “Spreadsheet URL.”
Your next step is to click on Advanced settings. This will open up a dropdown menu that looks like the image below.
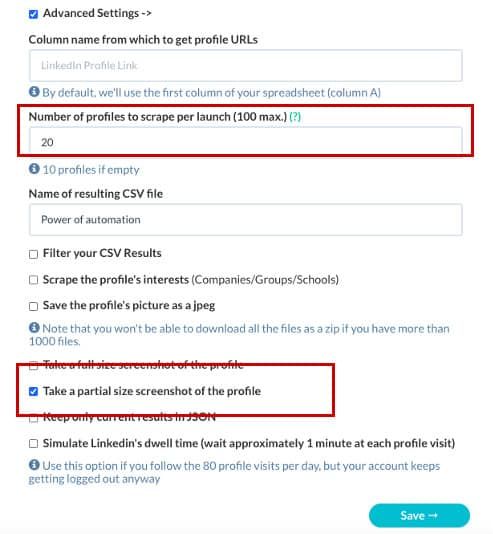
You can scrape a maximum number of 100 profiles per time. It takes Phantombuster around 10 minutes to scrape 30 profiles, including their partial screenshot. If you are on the free version, keep it under 30 profiles per time.
Make sure that in your advanced setting, the “Take a partial size screenshot of the profile” is checked.
Give your resulting CSV file a name and click “Save.”
After you click “Save,” you will go to a follow-up screen in which you can select whether you want to run this phantom ‘manually’ or repeatedly. If you have a larger data set, you want Phantombuster to run in the background, and you can select it repeatedly. Since Phantombuster runs in the cloud, you can even go to sleep, and Phantombuster does the work for you :). How about that for automation…
Click on safe and keep notifications on the next screen on any preference you like. I always keep it at none.
You are ready to scrape all publicly available information from your prospects’ LinkedIn profiles. Just click launch and let Phantombuster do the work for you.
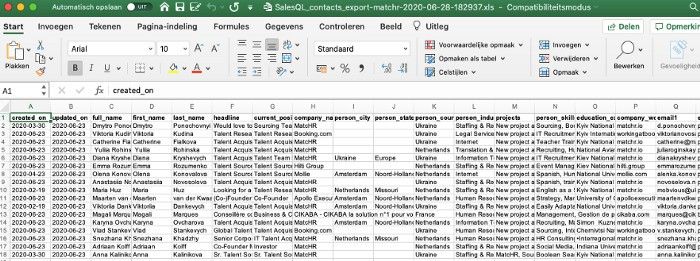
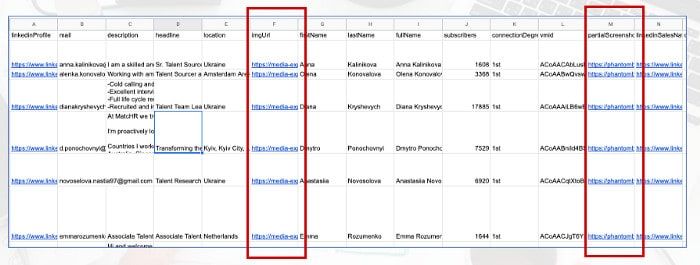
You can find your results under the ‘download all’ button, and by clicking the CSV file, you will be able to extract your results. Under “Files” on the right, you can find your download.
After you unpacked your CSV file, your results will look like this, and you need to look for the column “imgURL” (this is the profile picture) and the column with the title “partialScreenshot” (this is the partial screenshot of your prospects LinkedIn account).
Step 5. Filter out false positives
Now that you have scraped dozens if not hundreds of LinkedIn profiles, it is time to, once again, filter out false positives. To avoid that, you have to go through each LinkedIn profile so you can filter out false positives using this hack.
Add a filter to the spreadsheet and filter out false positives by filtering on:
- Job title
- Company (current or previous)
- Years of experience (filter on the column on “school date range” to get an estimation of years of experience)
- Years at the current company (filter on column “job date range”)
- Location (this can be misleading because not everyone updates their location)
- Other (skills, endorsements).
Once you have eliminated the false positives, copy and paste the columns you want to use for your outreach campaigns to a new Excel / Google Spreadsheet, which you will use to outreach via Dux-Soup and Lemlist.
Step 6. Connect at scale with Dux-Soup
After you have filtered out the false positives, it’s time to start reaching out at scale. Dux-Soup enables you to do this fast and efficiently.
Create a CSV file with at least the LinkedIn URL and the First name of the candidate you want to reach out to.
Create a connection request that doesn’t exceed 300 characters. You can use different placeholders in your connection requests like a reference to someone’s company or location.
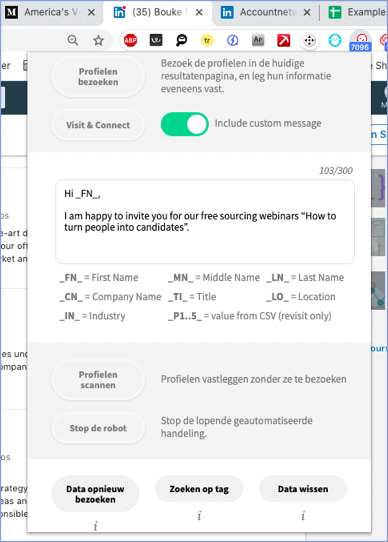
Type in the message box your connection request and click on ‘revisit data’ for the next step.
Once you have created this message, upload your CSV file in Dux-Soup by clicking at the bottom “revisit data” and upload your CSV file here.
And hit send and sit back and let Dux-Soup do the work for you.
Step 7. Check for email deliverability with Bouncer
Before sending out any emails, check whether the email addresses SalesQl found exist. You can use tools like Bouncer or Zerobounce. I use Bouncer, and if you use this code “MATCHR,” you can get a 10% discount on the credits you buy. The first 1,000 credits are for free.
Step 8. Send personalized emails at scale with Lemlist
Lemlist is an email automation tool that offers great personalization options to send out personalized emails at scale. You can try Lemlist for free for the first 14 days, but to send videos, you need to switch to their most premium package of $99 per month. Despite the costs, I highly recommend using Lemlist because of its powerful personalization options.
From the same candidate Excel / Google Spreadsheet file, you can now copy and paste the data you want to upload to Lemlist. Make sure to include the print screen of someone’s LinkedIn profile. Make sure you run through your placeholders to check for ‘normal’ names and titles.
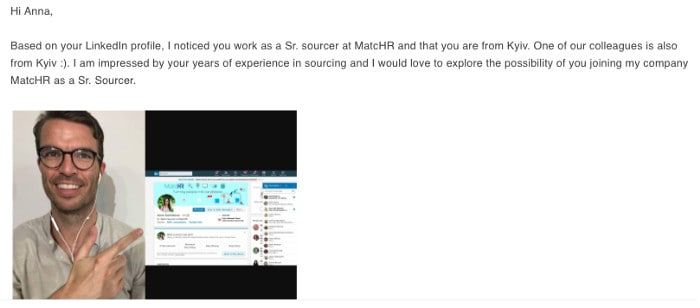
Create an outreach template in Lemlist. Try to put as many placeholders in your outreach template to make it feel personal and authentic but don’t overdo it. Create an image template of a picture of yourself pointing to the LinkedIn print screen of the candidate you are reaching out to.
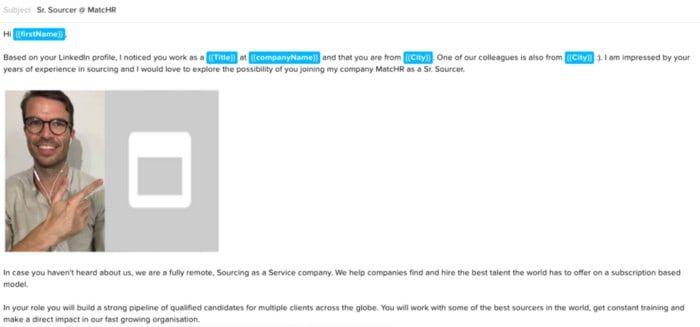
The candidate will get to see a (very) personal message with his/her own LinkedIn profile, a reference to her job, company, and the city she lives. Pretty personal for a ‘standard’ message, right :)?

Create several follow-up templates.
And hit send!
Step 9. Book a holiday
I wish this were true. Unfortunately, it doesn’t stop here because you need to start replying to all those candidates that keep coming back to you :).
Final thoughts
If you are new to these tools, it will take time to figure out all the steps. Once familiar with these tools and techniques, you can go through hundreds of profiles daily and send personalized connection requests and emails at scale.
If used well, automation can save you a tremendous amount of time, massively improve your efficiency and eliminate repetitive tasks.
If you are not a bot and have made it to the end of this article, you can help me by giving this article some claps and sharing it via social media and email.